Save a Custom Conda Environment (Tutorial)
Last updated 2026-04-13At a Glance
This tutorial explains how to use the HISE UI and SDK to create a custom Conda environment for your IDE. A Conda environment is a directory that contains a collection of user-selected packages. You can curate your own set of Conda packages or use a collection that someone else configured and shared with you. Custom Conda environments are easy to export and trace for transparency and reproducibility. For details, see Use the Conda Environment (Tutorial).
The new HISE environment-selection prompt now handles many scenarios that previously required the save_custom_conda_environment() workaround. If you upload files while more than one Conda environment is available, HISE prompts you to choose which environment to associate with your data, which reduces the need to save a custom environment just to keep files and results tied to the correct setup. Use save_custom_conda_environment() when you need to formally save or share a custom environment for reuse in HISE.
When to Use This Feature
Use this feature when you want to save and reuse a Conda-based IDE environment directly in HISE:
Capture a Conda environment from an existing IDE so you can recreate the same package setup later.
Share a standard Conda environment so that you and your colleagues start with the same versions of your tools and dependencies.
Preserve the exact environment you used for a key analysis so you can rerun it again with the same packages.
Maintain separate Conda environments for different projects or workflows (for example, quick exploration vs. regulated or publication-focused work).
Don't use this feature if you only need a one-off Conda environment for a single analysis or short-lived task. If you don’t need to share or return to the environment later, create and manage it directly in your IDE with standard Conda commands instead.
Required Configuration
To avoid build errors when you save a custom Conda environment, the R version must be 4.4.1 or higher, and the Python version must be between 3.10 and 3.13. Your environment.yml must list python or r-base in dependencies that match the languages argument you pass to save_custom_conda_environment(). For example, languages=["python"] requires python in the environment. Likewise, languages=["r"] requires r-base in the environment.
NOTE
If you include comments in your Conda environment files, your Conda build will fail.
In the YAML file, set the environment name to a simple identifier, not a full file path (for example, my_conda_env instead of home/workspaces/my_conda_env). If you use a slash (/) in the filename, your build will fail.
Signature and Parameters
The box below shows the save_custom_conda_environment() signature, and the method parameters follow.
save_custom_conda_environment()
 hp.save_custom_conda_environment(
    env_name: str,
    description: str,
    languages: list[str],
)
Parameter | Data type | Required or optional | Description | |||
|
| required | Name that appears in the HISE UI. | |||
|
| required | Description of the environment. | |||
|
| required | List of programming languages supported by the environment. |
 Get Help
If you get stuck while creating your custom Conda environment, refer to the steps of this tutorial (examples are in Python unless otherwise specified). To use the baked-in help in your IDE, try one of the following commands.
| Python | R | Output |
help(save_custom_conda_environment) | help(saveCustomCondaEnvironment) | Function signature, list of parameters, class, and a brief description of the method in a compact plain-text format |
hp.save_custom_conda_environment? | ?saveCustomCondaEnvironment | Method signature, docstring (description), file location, and file type in more readable format |
hp.save_custom_conda_environment?? | hise::saveCustomCondaEnvironment | Signature, docstring, file path, a verbose set of metadata, and the source code for the method |
Still not working? File a Support ticket.
Instructions
 Create a YAML file
You can create your own .yml file or follow the preferred method outlined here.
1. Navigate to HISE, and use your organizational email address to sign in.
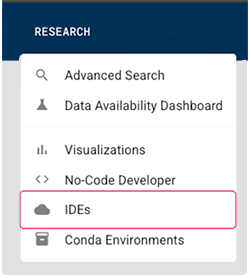
2. From the top navigation menu in HISE, click RESEARCH > IDEs.
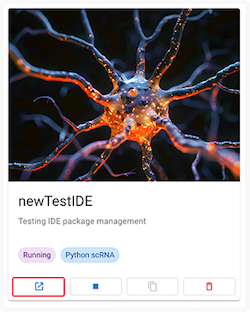
3. On the IDEs dialog page, click the boxed arrow icon on an IDE card to open an existing instance, or click CREATE IDE to create a new IDE instance.
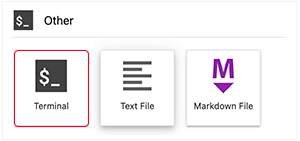
4. Click Terminal.
5. Enter the following command:
conda env export > minimal.yml
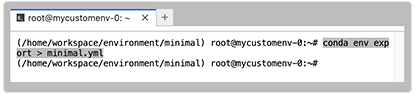
A file named mimimal.yml appears in your sidebar.
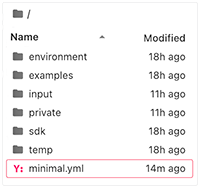
6. Click File > Download.

 Save Environment Programmatically or Upload YAML File
You can save your custom Conda environment programmatically, using the SDK (Method 1, preferred). If you're more comfortable with a manual approach, upload your YAML file through the HISE Conda Environments UI (Method 2, optional) You do not need to do both.
 Method 1 (Preferred)
1. In the terminal, call the hp.save_conda_env() SDK method.
A. At the terminal prompt, enter python.
B. Enter import hisepy as hp.
C. Enter the SDK call. An example appears below, but your name and description may be different, and you might have selected either Python or R (not both, as shown here).
EXAMPLE
|
D. At the prompt, enter y to proceed.

Method 2 (Optional)
1. Use the HISE UI to upload your YAML file.
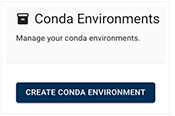
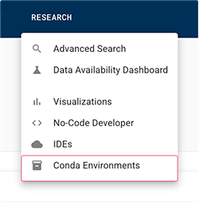
A. From the top navigation menu in HISE, click RESEARCH > Conda Environments.

B. On the Conda Environments page, click CREATE CONDA ENVIRONMENT.
C. In the Conda UI dialog box, enter the requested information, including the three required parameters.
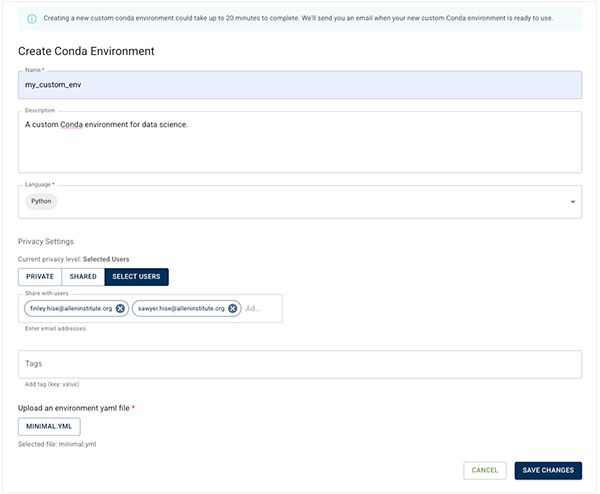
i. In the Name* field, enter a name for your custom Conda environment.
ii. In the Description field, describe the environment itself or the research for which you plan to use it.
iii. In the Language field, enter Python, R, or both.
iv. In the Privacy Settings section, choose PRIVATE, SHARED, or SELECT USERS.
v. If you choose PRIVATE (the default setting), the environment will be available only to you.
vi. If you select SHARED, the environment will be available to all HISE users in your account.
vii. If you choose SELECT USERS, enter the email addresses of those with whom you want to share the environment.
viii. (Optional) In the Tags field, add one or more tags to help you or your colleagues identify the new IDE.
ix. In the Upload an environment yaml file section, click CHOOSE FILE.
a. Upload the minimal.yml file you created in Steps 1.1 to 1.6, above.
b. (Optional) Alternatively, upload your own .yml file.
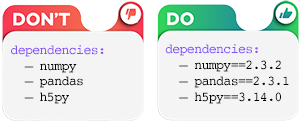
If you create your own .yml file, you must pin the version numbers of your dependencies. Doing so preserves the traceability of your environment and the reproducibility of your work.
|
D. Click SAVE CHANGES.
If you manually create a new Conda environment in your IDE (for example, using
|

 Use Your New Custom Conda Environment
In HISE, go to Research > Conda Environments.
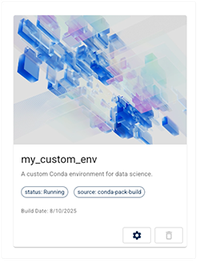
On the Conda Environments page, to create an IDE using the new environment you just created, click the card for your new environment.
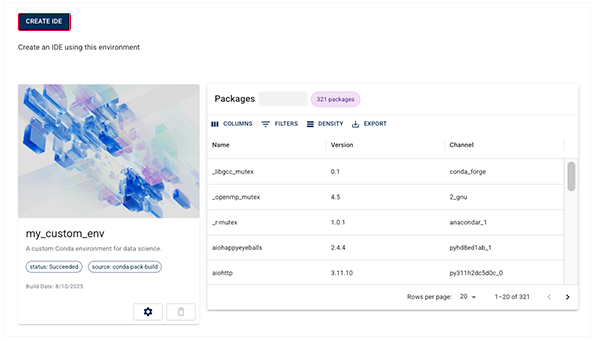
On the Environment Details page, click CREATE IDE.
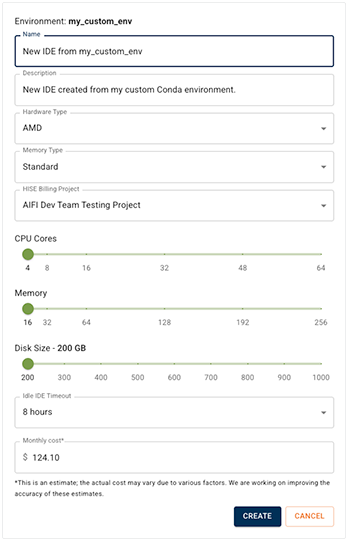
On the IDE Settings page, enter the requested information. If you're not sure which settings to choose, see Create Your First HISE IDE Instance (Tutorial) .
Cick CREATE.

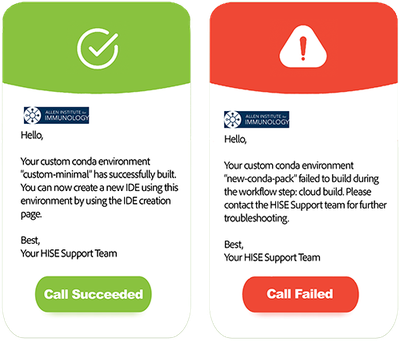
(Optional) Check your email for confirmation that your build succeeded. If it didn't, you'll receive a notification that indicates why the build failed. If you can't solve the issue on your own, file a Support ticket and we'll figure it out together.
 Related Resources
Use HISE SDK Methods and Get Help
Best Practices for HISE IDE Users
Use the Conda Environment (Tutorial)
Create Your First IDE Instance (Tutorial)