Use the Read Files SDK Method (Tutorial)


Last modified 2026-04-10


Support


Use the Read Files SDK Method (Tutorial)

Abbreviations Key

bool

boolean


IDE

integrated development environment


df

DataFrame


SDK

software development kit


desc

descriptor(s)


pd

pandas


dict

dictionary


tmp

temporary


HISE

Human Immune System Explorer


UUID

universally unique ID


hp

hisepy


At a Glance

This document explains how to use read_files() to download files to your HISE IDE. If you have questions, contact Support.

Method signature

read_files()

hp.read_files(
    file_list: list = None,
    query_id: list = None,
    query_dict: dict = None,
    to_df: bool = True,
is_public: bool = False,
)

readFiles()

readFiles(
  fileIds = list | NULL,
  queryId = character(1) | NULL,
  query = list | NULL
  isPublic = bool | FALSE,
)

Parameters

The parameters for this method are listed in the following table. In each key:value pair, the value must be of type list.

Python Parameters

Parameter


Data type


Description

file_list


list


List of UUIDS to retrieve

query_id


string


Value of the queryID from an advanced search

query_dict


dict


Dictionary that allows users to submit a query

to_df


bool


Boolean determining whether the result is returned as a DataFrame

is_public

bool

Boolean determining whether to query public files or not

R Parameters


Parameter


Description


fileIds


List of UUIDS to retrieve


queryId


UUID from an advanced search


query


List of query params to search for. The format is similar to that passed to getFileDescriptors, but the fields correspond to fields in the Subject materialized view. NOTE: fileType with a valid entry must be present


isPublic

Boolean determining whether to query public files or not.

Description

This function fetches HISE files and returns one or more objects when you pass in the following:

The object returned is either a dictionary (Python) or a list of data.frames (R). The dictionary or list contains keys [descriptors, labResults, specimens, values].


Instructions

The following instructions are written for Python. To adapt them for R, use the R function signature and parameters listed above.

 Import libraries

To get started, set up your environment to interact with HISE programmatically and access all available SDK functions. For details, see Use Hise SDK Methods and Get Help in the IDE.

1. Navigate to HISE, and use your organizational email address to sign in.

2. Open an IDE. For instructions, see Create Your First HISE IDE (Tutorial).

3. For programmatic access to HISE functions and efficient handling of tabular data, import the Python SDK and the pandas library.

# Import hisepy and pandas
import hisepy as hp
import pandas as pd

 Define file IDs

In this step, we define the file IDs for this notebook. For details, see Use Advanced Search (Tutorial).

1. Retrieve your own set of file IDs, and then define them as shown below. (The example below uses placeholder UUIDs—replace them with your own.)

# Define the file IDs used in this analysis 
FILEIDS = ['4551e620-48db-4328-a2b0-122730cd128d', '6417a4c5-098b-4d70-8c24-951e1c1c44ce']

  Return dictionary output and apply tabular format

To see what's in a given dictionary key, use the following format:

tmp['key']

For example, let's see what's in the descriptors key:

tmp['descriptors']

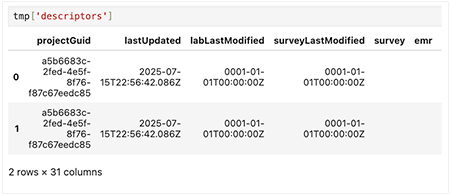
When you call read_files() with the to_df=True parameter, a dictionary is returned in which each key contains a pandas DataFrame. The to_df=True parameter arranges the data into a tabular format for easier analysis.
 

1. Pass your list of file IDs to read_files().

# Return dictionary output and print keys from read_files

tmp = hp.read_files(file_list=FILEIDS, to_df=True)

# Shows the class of the returned object

print("Type of tmp:", type(tmp))

# Prints all keys (file IDs or names) in the dictionary

print("Keys in tmp:", list(tmp.keys()))

The following output is returned.

 Preview the data

Each key in the tmp dictionary represents a different dataset returned by hp.read_files(). The accompanying table summarizes the content of each key. 

KeyDescription
descriptorsProject, sample, or subject metadata
labResultsTest results and IDs
specimensStatus and info on biological specimens
valuesRaw data metrics
errorsFile retrieval errors, if any

1. For each key, use a loop to print the file ID, the value type, and a preview of the data.

for file_id, value in tmp.items():
    print(f"File ID: {file_id}")
    print("Type of value:", type(value))


# If it's a DataFrame, show the first few rows
try:
    print(value.head())
except AttributeError:
    print(value)  # For non-DataFrame types
print("-" * 40)

2. To see all column heads for a given data set, use the following line.

print(tmp['descriptors'].columns)
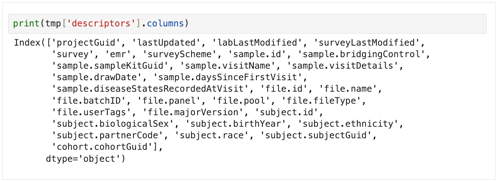
3. To get a summary of the DataFrame, use the following line.

print(tmp['descriptors'].info())
print(tmp['descriptors'].describe(include='all'))


Related Resources

 Query SDK fileType

Use HISE SDK Methods

Create Your First HISE IDE (Tutorial)

Prepare your visualization in an IDE

  1. Navigate to HISE, and use your organizational email address to sign in.

  2. Open an IDE. For instructions, see Create Your First HISE IDE (Tutorial) .

  3. To import hisepy, enter the following code into a new cell in your IDE.

# Import the Python SDK to enable programmatic access to HISE functions
import hisepy as hp

4. Load your data and generate a visualization, according to the needs of your study.

A. For simple visualizations, create a Plotly figure.

i. To make sure your code runs end to end in the IDE, run the following code in a new IDE cell: 
fig.show()

ii. To save the visualization, store it in a Plotly figure object to pass in later, as shown in the following block:

fig = px.scatter(
    x=[1, 2, 3, 4],
    y=[10, 15, 13, 20],
    title="Plotly example"
) 
# Create scatter plot
# Define values on x axis
# Define values on y axis
# Set chart title

B. For complex visualizations, build an app (for example, a DeckGL app) in your IDE workspace (for example, /home/workspace).

Create and save a hero image

Each saved visualization in HISE includes a static image visible to users who are browsing among the saved visualizations.

  1. From your IDE, export or otherwise save a PNG that represents your visualization (for example, a Plotly figure export or a screenshot of your app’s main view).

  2. Save the image somewhere in your IDE workspace (for example, /home/workspace), so the SDK can access it.

Path 1: Save a Plotly visualization As a starting point, you can use the sample Plotly notebooks in the IDE’s examples folder.

  1. Import the HISE SDK module. 

    import hisepy as hp

  2. Import Plotly Express.


    import plotly.express as px

  3. Confirm and note the file path to this PNG. You’ll need this path later, when you make the SDK call to save the visualization.
    fig.write_image("/home/workspace/example-plot.png")

  4. Call the SDK. Call save_visualization() with its required and optional parameters. The SDK saves your Plotly figure into the selected study as a saved visualization. HISE links that saved visualization to the IDE run that produced it, including input data, code, and environment.

    hp.save_visualization(
    figure=fig, studyspaceid="12345678-1234-1234-1234-123456789abc",
    title="Example Plotly visualization",
    png_image="/home/workspace/example-plot.png"
    )

    # SDK call
    # Plotly figure object
    # Study space ID
    # Descriptive title
    # Path of hero image

Path 2: Save a visualization app Use this path when you’ve built an app (for example, using DeckGL or Dash) and want HISE to build and deploy it using a visualization build template.

  1. Note your file path. Place your app files and directories in a location HISE can package. You’ll pass in these file and directory paths to save_visualization_app().

    /home/workspace/my-app

  2. Include your app’s main entrypoint and any framework-specific files (for example, DeckGL, package.json, server entry files).

  3. Any necessary configuration files or scripts for your app (for example, requirements.txt, config scripts).

  4. Do not include large input data files. Instead, upload those separately to your study space for your app to use when you run it.

  5. Capture your input file IDs. Before you call save_visualization_app(), save your input data files in HISE, since the app must read from those files.

  6. If your app uses files already present in your study space, capture their file IDs from HISE and have them ready to pass in.

  7. If your app uses files generated in the IDE that aren’t yet in HISE, upload them using the upload_files() (Python) | uploadFiles() (R) SDK method, and wait until those files become available.

  8. Collect the file IDs you want to include in your app, and keep them in a list (for example data_source_fileids()). You pass in these IDs to the data_source_fileids parameter.

  9. Select the data mount path. Choose a path (for example /data or /input) as the directory in which your input data is stored, so your app can read it at runtime. You pass in this path as the data_mount_path argument. If you forget the leading /, HISE adds it for you.

  10. Import the HISE SDK module. 


    import hisepy as hp

  11. Call the SDK. Call save_visualization_app() with the required parameters:

hp.save_visualization_app(

    application_files=["/home/workspace/my-app/app.py",

                       "/home/workspace/my-app/requirements.txt"],

    application_dirs=["/home/workspace/my-app/configs"],

    study_space_id="12345678-1234-1234-1234-123456789abc",

    title="Example visualization app",

    png_image="/home/workspace/example-app.png",

    data_mount_path="/data",

    data_source_file_ids=[

        "9f6d7ab5-1c7b-4709-9455-3d8ffffbb6c8",

        "0fb06e51-74c4-46be-b92d-5e045232b2d9"

    ]

)


/* SDK call

List of app file paths

App directories

Study space ID

Title (10+ characters)

Image path (PNG)

Where app reads data

Input data IDs for files in HISE */

(Optional) If you already know which visualization build template you want to use (for example a specific DeckGL template version), you can also pass in the following additional parameters:

i. build_template_name ii. build_template_major_version iii. build_template_minor_version iv. build_template_parameters  /* A map of framework-specific arguments, such as app entrypoint paths, which must match the build variables for that visualization build template / v. infer_build_template_arguments  /* Parameter that tells HISE whether to infer framework-specific arguments from your files and directories if you don’t supply them directly */

The save_visualization_app() SDK then packages your app files, applies the selected visualization build template, and starts a build workflow to deploy your app. It also creates a saved visualization in your study that points to the deployed app.

Call the SDK

Review the saved visualization in HISE

  1. Find the saved visualization, and share it with your team.

  2. From the top navigation menu, click COLLABORATION SPACE.

  1. Click the card that represents your study.

  1. In the side navigation menu, click Visualizations

  1. Find the card that represents your saved visualization (the one with your hero image on it), and click to open it.

  1. Review your saved Plotly figure or app-based visualization in Draft mode. 

  2. If you like, confirm the output with your collaborators. For instructions on adding collaborators to your study, see Work with Studies (Tutorial) . When you're satisfied with the saved visualization, mark it as Final.