Use the Sample Status Dashboard (Tutorial)
 | Abbreviations Key |
AIFI | |
ELN | electronic laboratory notebook |
GUID | globally unique identifier |
HISE | |
IDE | integrated development environment |
LIMS | laboratory information management system |
At a Glance
The Sample Status Dashboard offers an overview of the pipeline processing status of samples in a given project. Precise search filters help you home in on the results you want. For instance, to understand analysis status, you could look only at samples for a particular cohort and visit.
The following image shows the kind of stacked UI created in the Sample Status Dashboard when you apply various filters.
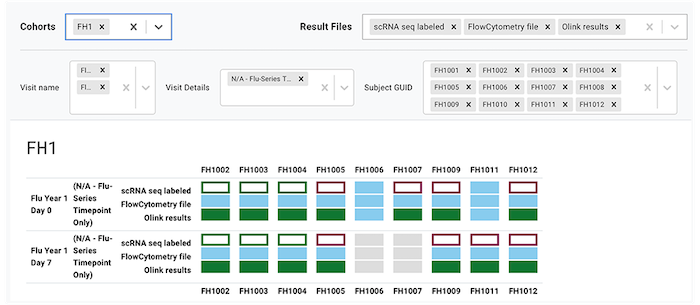
The dashboard shows how your experiments are progressing in LIMS and HISE. For details, see the following image and the corresponding table.

Status | Related to | Description |
|---|---|---|
NO SAMPLE AVAILABLE | LIMS content management | No sample is available in LIMS for this subject at the specified visit. |
SAMPLE RECEIVED | LIMS content management | Sample available in LIMS for this subject. No experiment has been requested in a workflow or in the ELN yet. |
EXPERIMENT REQUESTED | LIMS ELN and LIMS workflow |
|
EXPERIMENT IN PROGRESS | LIMS ELN and LIMS workflow | Processing has begun in the ELN or workflow for one or more specimens from the sample. |
EXPERIMENT COMPLETED | LIMS ELN and LIMS workflow | Processing is complete in the ELN or workflow for one or more specimens from the sample. |
EXPERIMENT REWORK | LIMS workflow | Specimens from the sample were canceled in a previous order and then batched again in another order. Note: This does not apply to specimens processed in the LIMS ELN. |
EXPERIMENT CANCELED | LIMS workflow | Specimens batched in the most recent order have been canceled for the specified experiment. Note: This does not apply to specimens processed in the LIMS ELN. |
FILE UNDER REVIEW | HISE | Experiment is complete, and the file is available for QC in HISE. An authorized team member must review the data and approve the file. |
DATA AVAILABLE | HISE | The experiment data has been reviewed and approved, and is now available for use in HISE and the IDE. |
Instructions
1. Sign in to HISE.
2. Choose the project(s) you want to work with.
A. In the upper-right corner, click your name.
B. From the drop-down menu, choose Environment.
C. On the Accounts tab of the Environment Options screen, choose the projects you want to work with. Be carefult to select only the projects whose results should be returned in your results. Choosing two or more projects that include the same study cohorts could yield duplicate data, such as sample data from duplicate patient visits.
3. Navigate to Data Processing > Sample Status Dashboard.
4. Apply filters
A. Choose cohorts.
i. To display a list of available cohorts, click the arrow to the right of the Cohorts field.
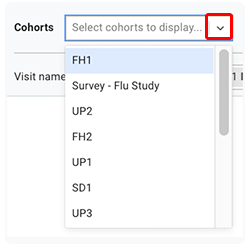
ii. Scroll to a cohort you want to add, and click to select it.

iii. To add multiple cohorts, click to select another one.

iv. To delete a cohort, click the small x to the right of its tag.

B. Choose result file types. Each result file, defined in HISE at the account level, belongs to a group. A group is a collection of result files. For example, scRNA-seq result files are in the scRNA-seq group.
i. Result file types are prepopulated in the Result files field. To display more file types, click the arrow to the right of the Result files field.
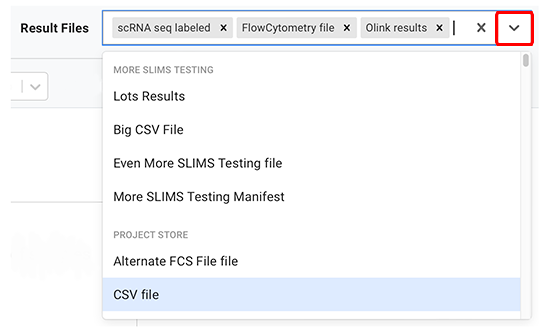
ii. If you don't need results from all of the prepopulated file types, click the small x to the right of the tag to delete each type you don't want.

C. Choose visit names. In HISE, a sample represents a single collection, also known as a visit. You can filter for one or more visits by choosing from a list populated by the project cohorts.
i. To display a list of available visit names, click the arrow to the right of the Visit name field.
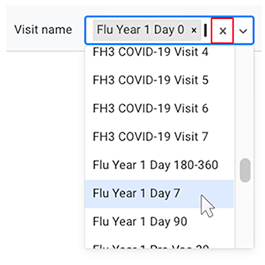
ii. Scroll to a visit name you want to add, and click to select it.

iii. To add multiple visit names, click to select another one.

iv. To delete a visit name, click the small x to the right of its tag.

D. Choose visit details.
i. To display a list of available visit details, click the arrow to the right of the Visit Details field.
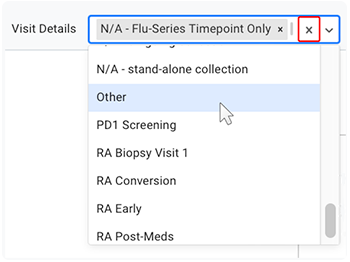
ii. Scroll to the tag you want to add, and click to select it.

iii. To add multiple tags, click to select another one.

iv. To delete details for a given visit, click the small x to the right of the Visit Details tag.

E. Choose subject GUID.
i. To display a list of all available subject GUIDs, click the arrow to the right of the Subject GUID field.
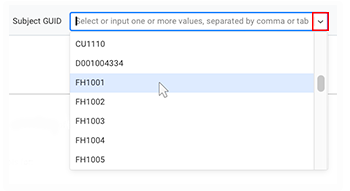
ii. Scroll to a GUID you want to add, and click to select it.

iii. To add multiple GUIDs, click to select another one. You can add as many as you like.

iv. To delete a GUID, click the small x to the right of its tag.

 Related Resources
Configure a Pipeline (Tutorial)
