The Great NextGen IDE Migration (Tutorial)
At a Glance
NextGen IDEs are here! We don't want you to lose any of your data before we delete the legacy IDEs. After Thanksgiving break, we plan to hold NextGen IDE training sessions. One of the developers will walk through how to move files to your /private folder. That training will be recorded.
This document shows you how to migrate your existing IDEs to the NextGen platform. For FAQs, see Migrate to the HISE NextGen IDEs (Q&A). For other NextGen IDE documentation, see the list at the bottom of this page.
Instructions
Good news! After migrating your files, you can keep your entire folder and file structure the same. It's stored in a cloud folder (a Google bucket) called /private. There you can browse your files and folders as you normally would. Files written into the /private folder are placed into cheap, durable cloud storage that persists even after the IDE is deleted. For details, see Explore NextGen IDE Folders.
Before NextGen IDEs were launched, you could create up to five private folders per account. The purpose of those folders was to access a Google bucket in order to transfer files between IDEs. Now you can accomplish that same task within a single |
Step 1: Clean up old files
Before you get started, take this opportunity to scrap some of the cruft that's accumulated in your file tree. This cleanup makes it easier for you to find what you need and reduces cloud storage costs for your group.
1. Delete everything from /home/jupyter/cache that was read into memory or downloaded and cached using one of the following methods:
| Python | hisepy.read_files() |
| R | readFiles() |
It's not necessary to retain these files. In the NextGen IDEs, these functions have been optimized so that downloading is nearly instantaneous.
Step 2: Migrate files to your /private folder
To migrate your files from the current-gen IDE to the NextGen IDE, you can use SDK methods or gsutil to copy your files directly to the /private folder. The migration method you choose depends on the size and number of your files.
1. File size < 1 GB: Use SDK methods. Here we focus on file upload methods:
| Python | upload_file_to_private_folder(file_path, private_folder_name) |
| R | uploadFileToPrivateFolder(filePath, privateFolderName) |
The function signature is the same as before except that the private_folder_name parameter is now optional. To access any personal folders you created before the NextGen beta release, specify the folder name. Otherwise, use the /private folder created by default as part of every NextGen IDE's folder structure.
2. File size > 1 GB: Use the gsutil method. Some users store TBs of data in their IDEs. These dates are based on Google's Vertex AI deprecation schedule (for details, see the Q&A document). In addition, some IDE files are so large that neither the SDK nor the JupyterLab UI is performant enough. In such situations, we'll grant access to a larger cloud storage space for a limited time.
A. To request this option, find your IDE instance on the AIFI IDE Inventory sheet. This sheet was included in the email you received from Neelima Inala on 2024-11-26. Use column J to request support from the dev team.
B. To tar up the /home/jupyter directory of your legacy IDE, see the following steps (for details about creating tar files, see Step 2 of Ingest Data into the Project Store):
tar -cvf ide1_files.tar /home/jupyter --index-file=ide1_files.out
C. To copy the tarball and the index file to your /private folder, run the following command from your terminal or a command prompt:
gsutil cp /home/workspace/ide1_files.tar gs://<path_to_private_folder_google_bucket>gsutil cp /home/workspace/ide1_files.out gs://<path_to_private_folder_google_bucket>
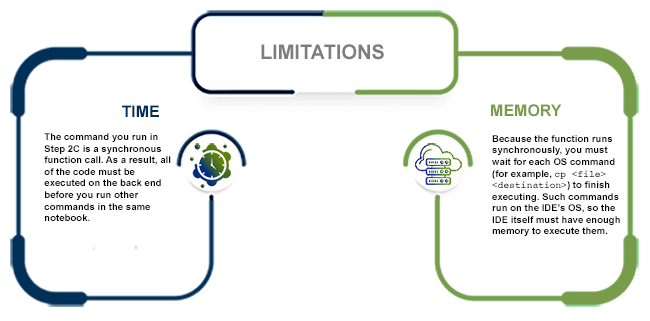
Be aware of the limitations outlined in the following image.

D. Next, extract the tar file:
i. Provision a NextGen IDE for the associated account.
ii. Allocate the required amount of disk space during provisioning so that the tar file can be extracted in the root disk.
iii. To untar the file from your /private folder, enter the following command in your terminal:
tar -xvf ide1_files.tar /home/workspace/private/ide1_files.tar /home/workspace/<migrationfolder>/
E. Verify that the files in the original tar file have been extracted:
i. To recursively list the /home/workspace/<migrationfolder>/ directory, enter the following command in your terminal: find “$PWD” > ide1_files_extracted.out
ii. Compare ide1_files.out (original index used in tar file) with ide1_files_extracted.out. To look for missing files, ensure that both are sorted, and use a diff tool to compare them.
iii. To compare the source and target file sizes, enter the following commands:
du -sh /path/to/source/file

du -sh /path/to/target/file
F. Generate and validate checksums:
i. For local files:
md5sum /path/to/file.obj
ii. For files in a Google Cloud storage bucket:
gsutil stat gs://bucket/path/to/file.obj
G. Upload the extracted files to your /private folder.
i. For files whose individual file size is < 50 GB, use the following command:
cp -r /home/workspace/<migrationfolder>/ /home/workspace/private/
ii. For files whose individual file size is > 50 GB, use the following command:
gsutil -m cp -r /home/workspace/<migrationfolder>/ gs://<path_to_private_folder_google_bucket>/<extractfolder>
 Related Resources
Create Your First NextGen IDE Instance (Tutorial)
Manage NextGen IDE Instances (Tutorial)
